We’ve been working with CyberArk to create an adapted version of my 2 original blogs (here and here) for the broader CyberArk community.
Take a look here for the official CyberArk Success Adapted Blog how-to: CyberArk Integration with ServiceNow Ticketing System Walkthrough. If you prefer, follow along below instead.

CyberArk Integration with ServiceNow Ticketing System Walkthrough
This CyberArk Success Blog article is an adapted version of two original posts by Joe Agler, Founder and Principal Consultant at KeyVault Solutions, a CyberArk Authorized Partner.
If you already have your own company ServiceNow non-prod environment, you can skip the “Setup ServiceNow Dev instance” section below.
Prerequisites —
- Required ServiceNow and CyberArk Licenses
- PVWA v9.8+ preferably
- An already deployed, configured, and operational CyberArk environment
- Admin/RDP access to your PVWA server
- PVWA server access to ServiceNow API URL
- Only required for older CyberArk versions (under 9.8) — CyberArk ServiceNow Ticket integration downloaded from CyberArk Marketplace.
- Your internal ServiceNow IT support team to perform the steps below if you don’t have access to create and provision the read only svc account for your ticket integration use.
Setup ServiceNow Dev instance:
A while back I discovered that ServiceNow Dev instances are free. Really. It’s amazing. We’ll utilize this to configure our CyberArk Ticket Integration with ServiceNow.
Head over here — https://developer.servicenow.com/
- Sign up for a ServiceNow Developer ID
- Click on Request an instance from the menu. Choose Utah or whichever latest version you want to test against.

ServiceNow Dev instance is being created
- Activate whatever ServiceNow plugins you want to play with for your instance
- Wait a bit for it to create and spin up (~10 minutes, if that)
- Log into the Dev instance with the l/pw it provides.
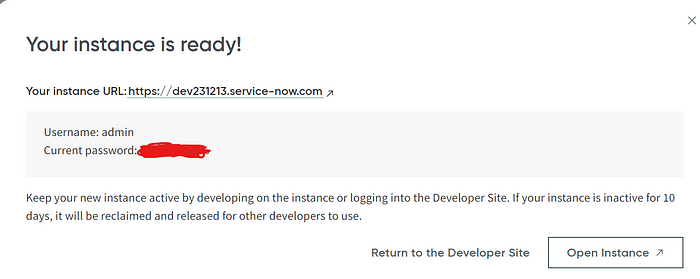
ServiceNow Dev instance is ready — with l/pw provided to use.
Create your ServiceNow read-only svc account to utilize:
- Log onto your ServiceNow dev instance with the admin l/pw provided
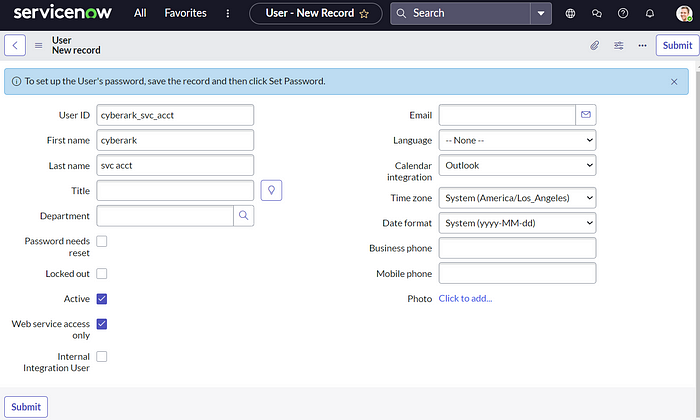
- Click All>User Administration>Users

- On the top right, click new.

- Name the internal account cyberark_svc_acct, checkbox for active, and a checkbox for web service access only.
*Note: You can utilize a domain user service account for this as well if you like, however for demonstration purposes I’m just using an internal ServiceNow user.
*The Web service access only check box to designate this user as a non-interactive user. This field is available with Non-Interactive Sessions.
- Click Submit to create the account.
- Click Set Password
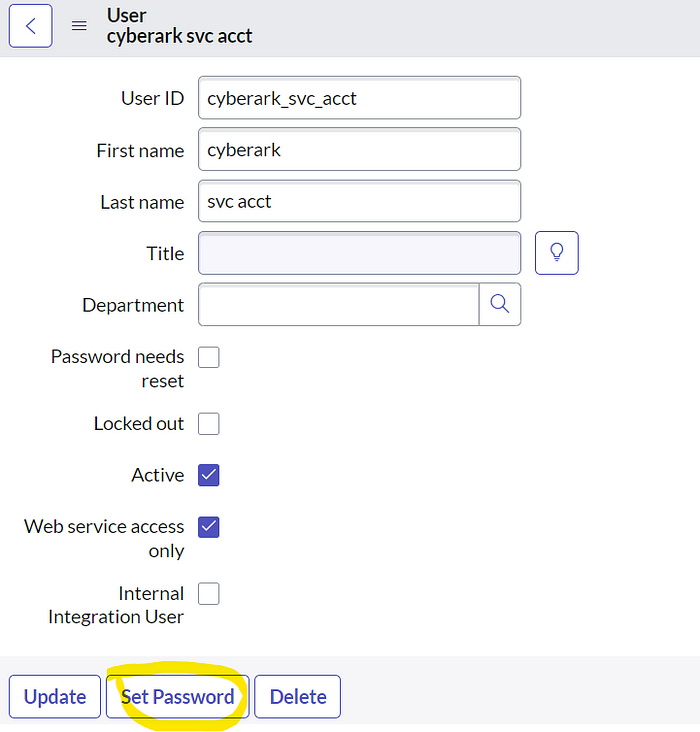
- Click the Generate button.
- Click the copy password button next to generate. Keep that safe for now until we get to the next steps.

- Click Save Password. Click Close.
- Scroll down and click the Roles tab. Click Edit
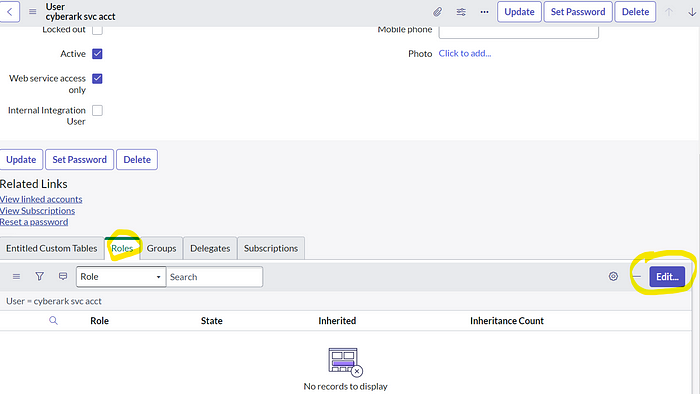
- Search the collection for sn_change_read, click it, then click the > button to add the role. Do the same for the sn_incident_read role. See below. Click Save.

- The ServiceNow read only roles have been added to our svc account for use.

Onboard your ServiceNow cyberark_svc_acct to your CyberArk Vault:
- Log on to your PVWA site as an admin.
- Click Accounts>Add Account. Fill out the related items. I use the classic interface as my preferred method. See below for an example. Place the “cyberark_svc_acct” account under the PVWATicketingSystem safe as it has the required permissions by default. Note that I’m setting the object name the same as the username just so it’s easier to reference on another step.

- Click Save.
- Ok, now delete the temp notepad/text file you had with that massive password string for the ServiceNow svc acct. Only keep it in the vault, not cleartext!

Configure your PVWA server:
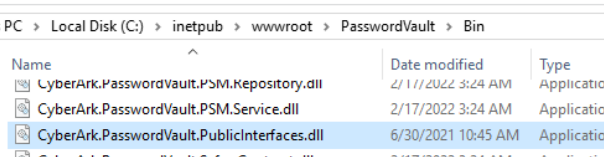
- In newer CyberArk PVWA versions (v9.8 and higher) this step isn’t necessary since the files exist already “out of the box” under C:\inetpub\wwwroot\PasswordVault\Bin .
- If you don’t have these files listed in that folder, extract the downloaded CyberArk ServiceNow Ticket integration zip file from the marketplace.

- Stage the 2 dll files onto your PVWA server, under C:\inetpub\wwwroot\PasswordVault\Bin .
*Note — this will cause IIS to reset.
- Check to make sure IIS is back up.
Configure ServiceNow Ticket Integration within PVWA:
- Log onto PVWA site as an admin
- Navigate to Administration>Options>Ticketing Systems>ServiceNow.
- Expand Ticketing Parameters>SystemConfiguration
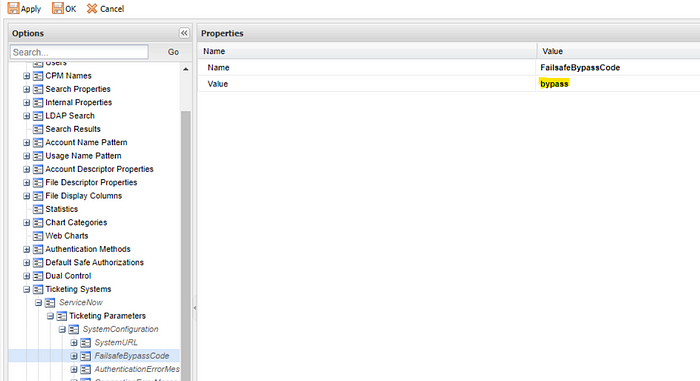
- Click on SystemURL. Update this to your ServiceNow Dev instance URL. Click apply.

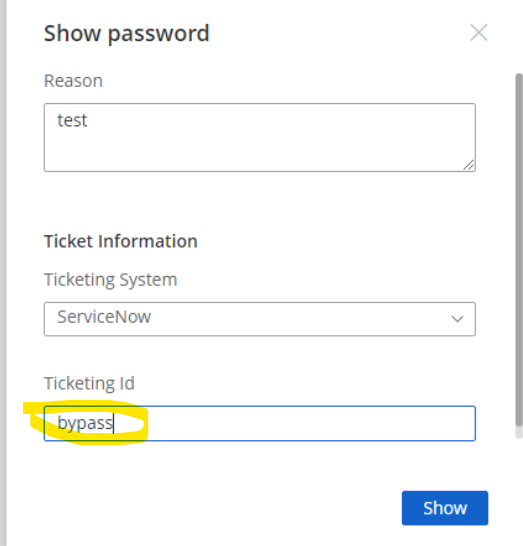
- If you need a ticketing bypass code configured, click on the FailsafeBypassCode and enter in whatever bypass code value you want to use. In the example below, I used bypass . Click apply. The codes are case-sensitive.
- Click on the Connection Details item. Populate the details of where your cyberark_svc_acct is stored. Remember that it’s within the “PVWATicketingSystem” safe, and we named the object the same as the username.

- Click apply.
Configure your related platform to enable ServiceNow Ticket Integration within PVWA:
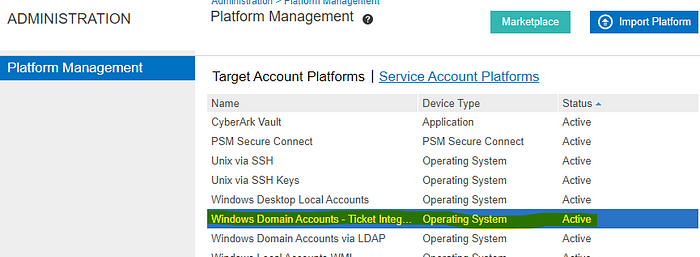
- Navigate to Administration>Platform Management. Find the related platform you want to enable ticket integration for. In this example, we’ll enable it for the Windows Domain Account — Ticket Integration platform I previously created.
- Click Edit

- Expand UI & Workflows. Click on Ticketing System.
- Set EnterTicketingInfo to Yes.
- Set ValidateTicketNumber to Yes.
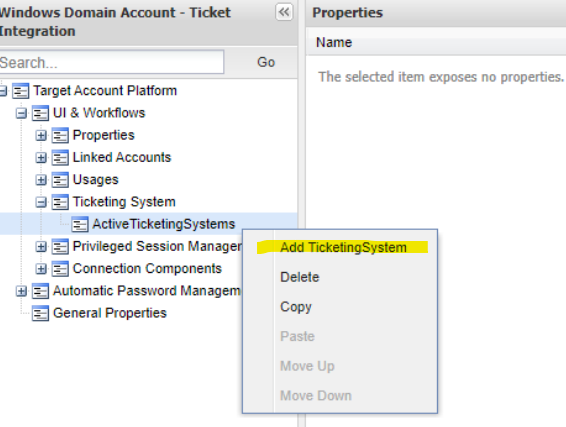
- Right click on Ticketing System> click Add ActiveTicketingSystems.

- Right click on ActiveTicketingSystems, click Add TicketingSystem.
- Set the value of TicketingSystem to be ServiceNow, which is the same name referenced under Options that we configured previously.
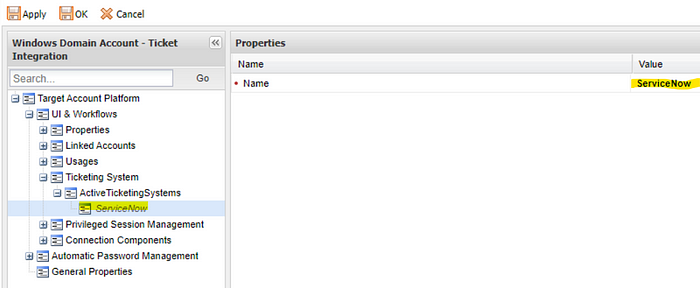
- Click Apply.
Let’s test it out!:
- Adjust whichever Windows Domain Accounts you have that you require Ticket Integration to utilize the Windows Domain Account — Ticket Integration platform.
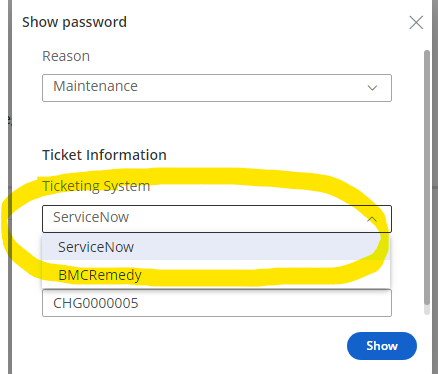
- We’ll select the test.priv account on acme.com to test with. Click on Show, Copy, or Connect, and it will default to utilize the ServiceNow TicketingSystem we set on the platform, and will now show a Ticketing Id field.

- Populate the Reason and related TicketID (INC or CHG).

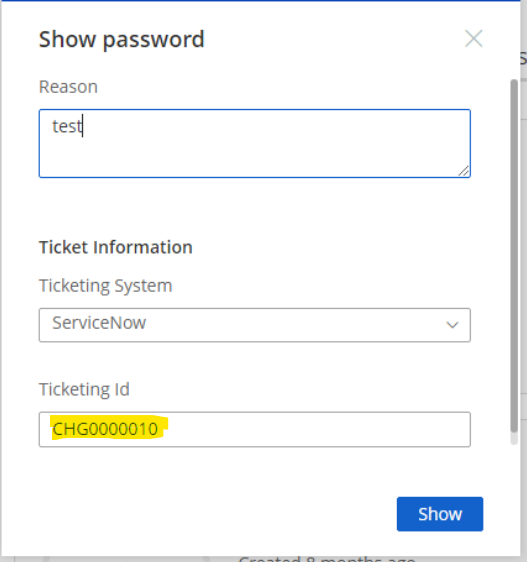
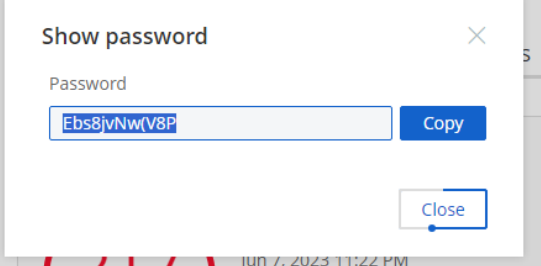
- If the ticket ID (CHG or INC ) exists, you’ll be able to show or use the password.
- If the TicketID doesn’t exist, it will fail.
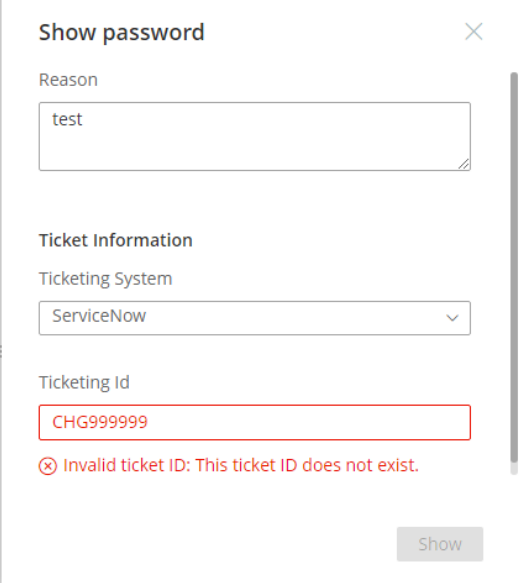
- If the TicketID format is invalid, it will fail.

- Now lets try that bypass code in case ServiceNow is down.

- The super basic pieces worked!
“I have more requirements though!!! Auditors need us to do this, and this!”:
- Continue to part 2 below or directly: Part 2
- Okay, okay! So if you need to configure things like validating the INC or CHG state, Approval Status, Ticketing TimeFrame, or Requesting User… then there are additional settings you can configure.
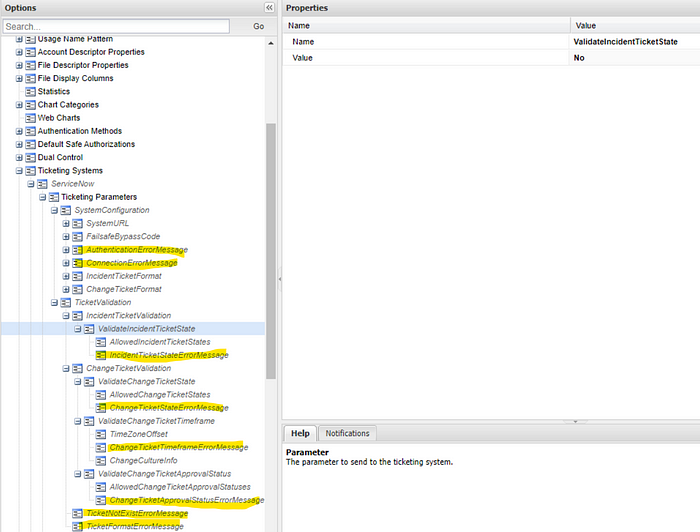
- Check out the additional settings under Administration>Options>Ticketing Systems>ServiceNow>IncidentTicketValidation, and ChangeTicketValidation.
- Here’s the official documentation you can review.
- See the image below related to the settings you can adjust as needed per your requirements.

Troubleshooting — “It isn’t working for me still. What did I miss!?” :
- Check out the PVWA logs that are under C:\Windows\Temp\PVWA\ for clues as to the issue(s) you’re having.

- See below related to the specific PVWA WebSession log which indicated my PVWA server was able to reach the ServiceNow Dev instance and query for the CHG I provided.


- Check the CyberArk Support site for your related error(s).
- Ask a co-worker to look at it as well for a second set of eyes to determine the cause.
- Create a CyberArk Support Case.
Recommended items:
- Document your ticket integration! Yes, I know, no one will read it…. but do it anyways for your own benefit. It’s good to practice writing, and being able to refer back makes your life easier. Trust me.
- Configure and enable password rotations for your ServiceNow service account.
- If your ServiceNow environment allows for using a domain service account, you could utilize that instead for the integration and use the out of box windows domain account rotations platform.
- Explore the CyberArk marketplace for other ServiceNow integrations.
- Discuss internally if you want to remove requiring a reason field entry for your ticket integrated platforms. Since the TicketID field references the ticket, a reason isn’t needed and most times provides little actual value, aside from seeing what people enter in; “letmein!”,
- I recommend that you adjust the ticket integration errors to be more helpful for your users — look under Administration>Options>Ticketing Systems>ServiceNow. See the image below and the related documentation at the bottom of this blog.
Continue the Journey with Part 2:
A big part of this is gathering requirements from your “customer”, whether that’s internal or external. Find out what Change/INC states are allowed per their or your own audit and/or compliance teams, or even your internal Change Management team whom may administer what should be allowed or not. Include other stake holders in deploying this requirement.
There are multiple ticket states and types within ServiceNow which are utilized for different reasons. In this walkthrough, we’re only focused on the items which are currently supported by the CyberArk + ServiceNow out of the box ticket integration at this time; CHG, INC.
Prerequisites —
- See the previous blog related to items you’ve already configured related to the super basic allowed items with CyberArk + ServiceNow ticket integrations.
Configure ticket validations by state:
- Log onto PVWA as an administrator.
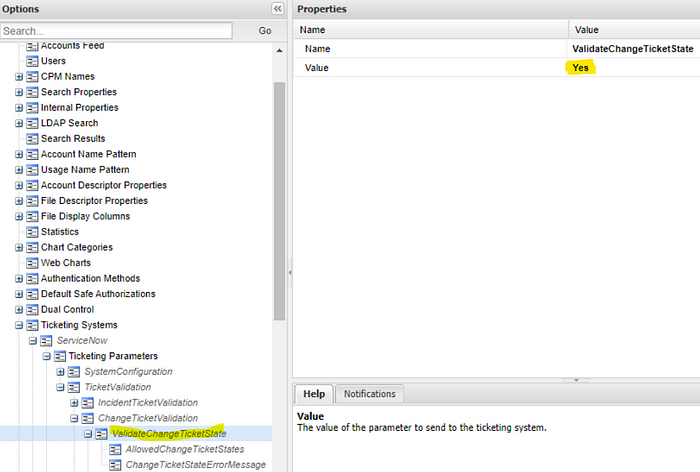
- Administration>Options>Ticketing Systems> ServiceNow > Ticketing Parameters > TicketValidation > ChangeTicketValidation, set ValidateChangeTicketState to Yes.
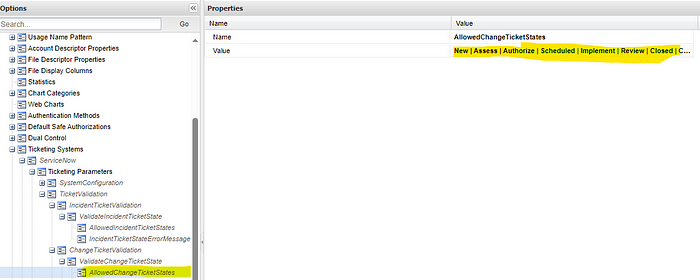
- Under ChangeTicketValidation, click on AllowedChangeTicketStates.
- See the below related to the settings you can adjust as needed per your requirements.
- For CHG artifacts, these are the state options: New | Assess | Authorize | Scheduled | Implement | Review | Closed | Canceled

- Under ServiceNow > Ticketing Parameters > TicketValidation > IncidentTicketValidation, set ValidateIncidentTicketState to Yes.

- Under IncidentTicketValidation, click on AllowedIncidentTicketStates.
- See below related to the settings you can adjust as needed per your requirements. Leave the states you only want to be allowed for a user to pull a credential.
- For INC artifacts, these are the state options: New | In Progress | Closed | Canceled | On Hold | Resolved

- Click Apply to save your adjustments.
Configure Validate Change ticket approval status:
- Under ServiceNow > Ticketing Parameters > TicketValidation > ChangeTicketValidation, set ValidateChangeTicketApprovalStatus to Yes.
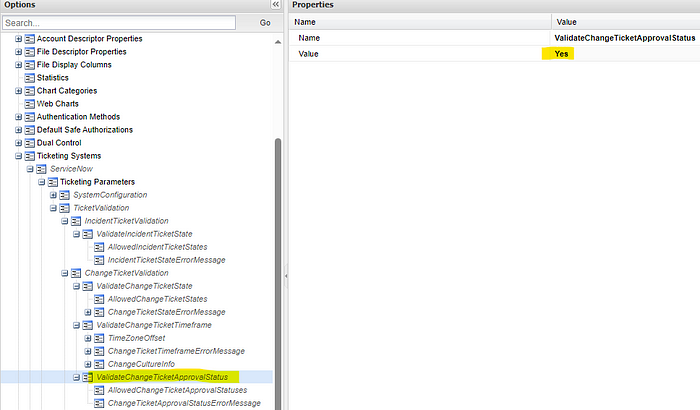
- See the image below related to the settings you can adjust as needed per your requirements.
- CHG Approval Status options: Approved | Not Yet Requested | Requested | Rejected

- Click Apply to save your adjustments.
Configure a Ticket bypass code:
- In case you didn’t create one previously…
- Under ServiceNow > Ticketing Parameters > SystemConfiguration, click on FailsafeBypassCode.
- Update the value to be whatever you prefer as a bypass word.
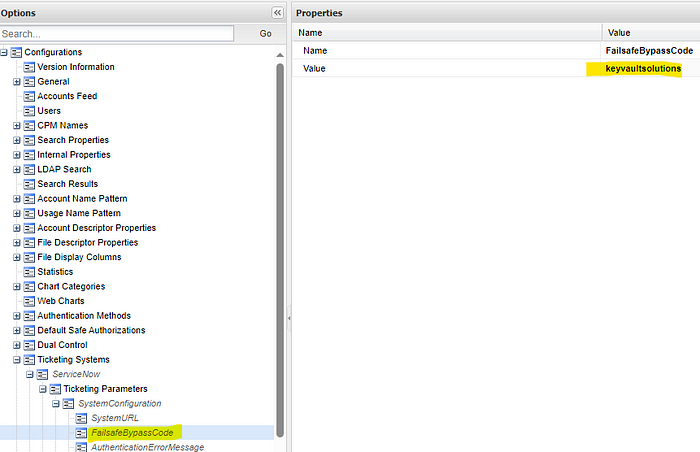
- Click Apply to save your adjustments.
Option 1 — Remove Requiring users to specify a reason for access for Ticket Integrated platforms:
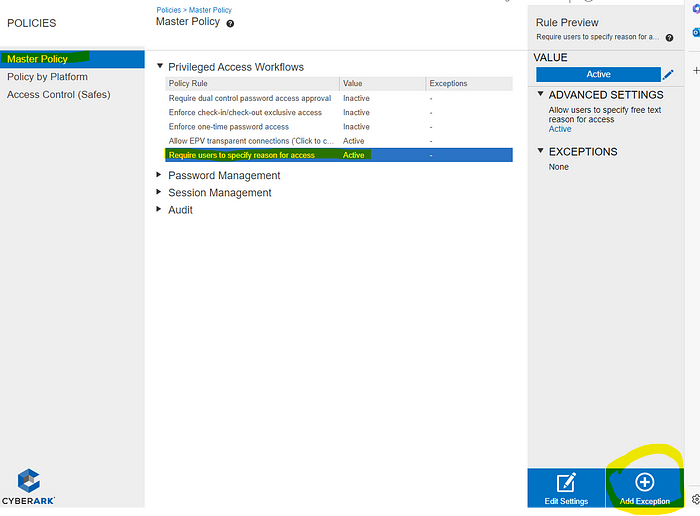
- Policies>Master Policy>click on Require users to specify reason for access (default is Active)
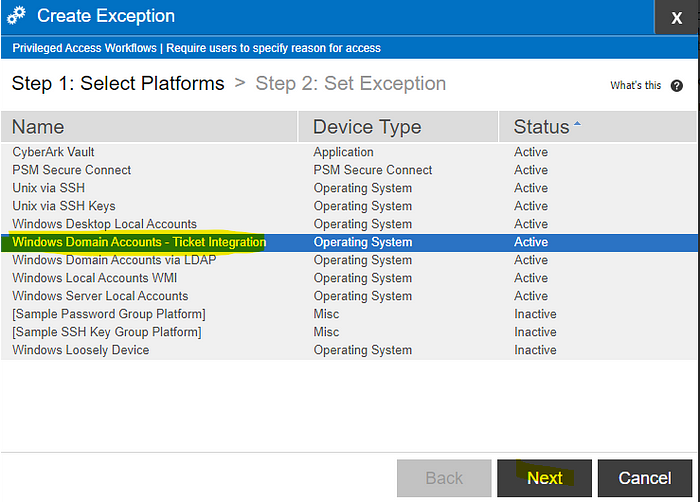
- Click Add Exception

- Select your ticket integration platform and click next.
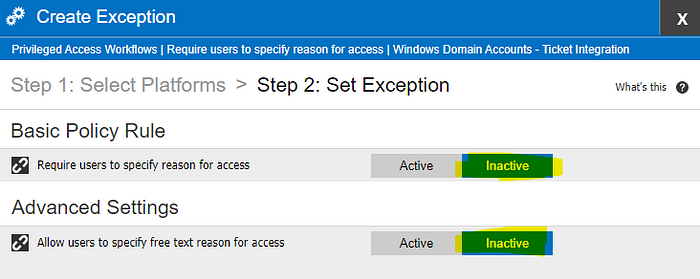
- Set Require users to specify reason for access to Inactive.
- Set Allow users to specify free text reason for access to Inactive.
- Click Finish.

Note that the new Modern UI vs old UI acts differently. In the modern UI it will still show the reason box, however users won’t be required to enter anything once set. In the Classic UI it won’t show the reason box at all since it’s optional.
Option 2 — Require users to specify a provided reason for access for Ticket Integrated platforms:
- Policies>Master Policy>click on Require users to specify reason for access (default is Active)
- Click Add Exception
- Select your ticket integration platform and click next.

- Set Require users to specify reason for access to Active.
- Set Allow users to specify free text reason for access to Inactive.
- Click Finish.


Set specific reasons for use:
- Administration > Platform Management>click the related ticket integration platform. Click Edit.
- Right click on UI & Workflows. Add Privileged Account Request.
- Right click on Predefined Reasons and select add reason.
- Add whatever reasons you want to require from your users to choose from.
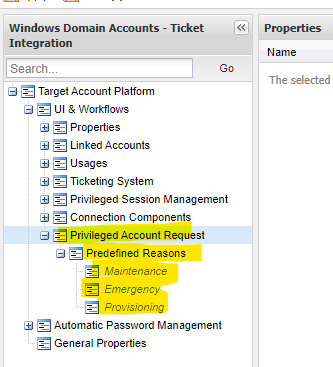
- Click Apply to save your adjustments.
- See below for what it looks like related to the provided reasons you set above for the users.

Recommended items:
- Limit sharing and/or use of any bypass codes. Ideally these would only be provided CyberArk PAM admins to users temporarily when ServiceNow systems are down.
- Depending on the outage length, you can simply turn off ticket validations on the related platform(s) until ServiceNow is available again. See the image below. This would still require the user to provide the related ticketing information but not validate the ticket format, states, etc. Be sure to re-enable this once ServiceNow is back up.

- In need of multiple ticketing integrations set for use during a transition from one ticketing system to another?
- Administration > Platform Management>click the related ticket integration platform. Click Edit. Navigate to Ticketing System. Right click on ActiveTicketingSystems, and choose add TicketingSystem. Add the name of the second ticketing system you configured separately. For example, BMCRemedy. Click Apply to save settings. When migrations are finished, remove the original option and save.

Need help securing your privileged accounts with CyberArk?
Contact Us — https://www.keyvaultsolutions.com/pages/contact-us
Additional Resources
Readers are encouraged to explore the official CyberArk documentation on ticketing integration for further technical guidance. For additional support, the PAM Self-Hosted Admin Resource Center and the Privilege Cloud Admin Resource Center remain valuable resources.
For organizations seeking expert assistance, KeyVault Solutions provides end-to-end Privileged Access Management (PAM) expertise across diverse environments, from on-prem, hybrid to cloud-native infrastructures. As a trusted CyberArk partner, KeyVault Solutions offers advisory, integration, implementation, training, and managed services to reduce risk and strengthen security across the enterprise.
PrivilegeFlow, a strategic solution from KeyVault Solutions, is intended to enhance the integration of privileged access workflows with ServiceNow for CyberArk customers. Aimed at streamlining ticket validation, improving operational efficiency, and supporting audit and compliance readiness, PrivilegeFlow reinforces security controls and aligns privileged access with IT Service Management (ITSM) processes. With broad support for ServiceNow ticket types, including Incidents, Changes, Requests, Problems, and Catalog Tasks, PrivilegeFlow ensures flexible integration with ITSM workflows. In addition, PrivilegeFlow writes audit data directly to ServiceNow Work Notes, ensuring clear traceability of access validation activity and further strengthening audit and compliance posture
Whether you’re addressing audit findings, maturing your PAM implementation, or requiring custom CyberArk plugins (CPM or PSM), KeyVault Solutions delivers the expertise to support your security and compliance objectives.
For more information on KeyVault Solutions and PrivilegeFlow, visit KeyVaultSolutions.com.